With 4 knots of tide pushing against a solid 5ft westerly swell, Trevose Head felt like the perfect place to put a new setup to the test.
I’d not paddled it on the ebb before, so it was a chance to tick off two things at once.
Paddle the race and test a camera mount I’d been piecing together over the last few weeks.
Why Build a DIY Mount?
Like a lot of paddlers, I’ve spent years trying to capture what it actually feels like to be in a tide race or rough water.
And at times, I’ve been a bit underwhelmed.
Deck mounts often feel flat and while helmet cams are useful, they don’t always tell the full story. Multiple angles help but they still miss that sense of movement and scale.
The footage that really works tends to come from boom-style mounts. The ones that push the camera out and away from the kayak, giving that third-person perspective.
That’s where the inspiration came from:
- The Boom Master 3000 setup from River Kings
- Nick Butterfield’s stable sea kayak setup and rough water testing
As shown in Nick’s videos, commercial options like the Jackson Levator exist and they’re good. Long, rigid boom mounts produce more stable footage with less shake and a much better sense of perspective in rough water.
But they’re not cheap and they’re not always easy to get hold of in the UK.
So I built my own version, combining elements from both.
The Idea Behind the Mount
The goal was simple:
- Get the camera higher and further away from the kayak
- Keep it rigid enough to reduce shake
- Make it quick to set up and adjust on the beach
- And most importantly… make sure it doesn’t rip off in the impact zone
Most boom mounts work on the same principle. A fixed base with an extended arm gives you that elevated angle that transforms footage completely.
The challenge is making that system strong enough for real conditions.
The Build
One of the biggest challenges wasn’t the design, it was sourcing the parts. (Parts list found at the bottom of the page).
Most of the reference builds, especially the River Kings version, are based around US hardware stores. While everything is technically available here, sizing doesn’t always match, so I ended up mixing UK and US components which didn’t always play nicely together.
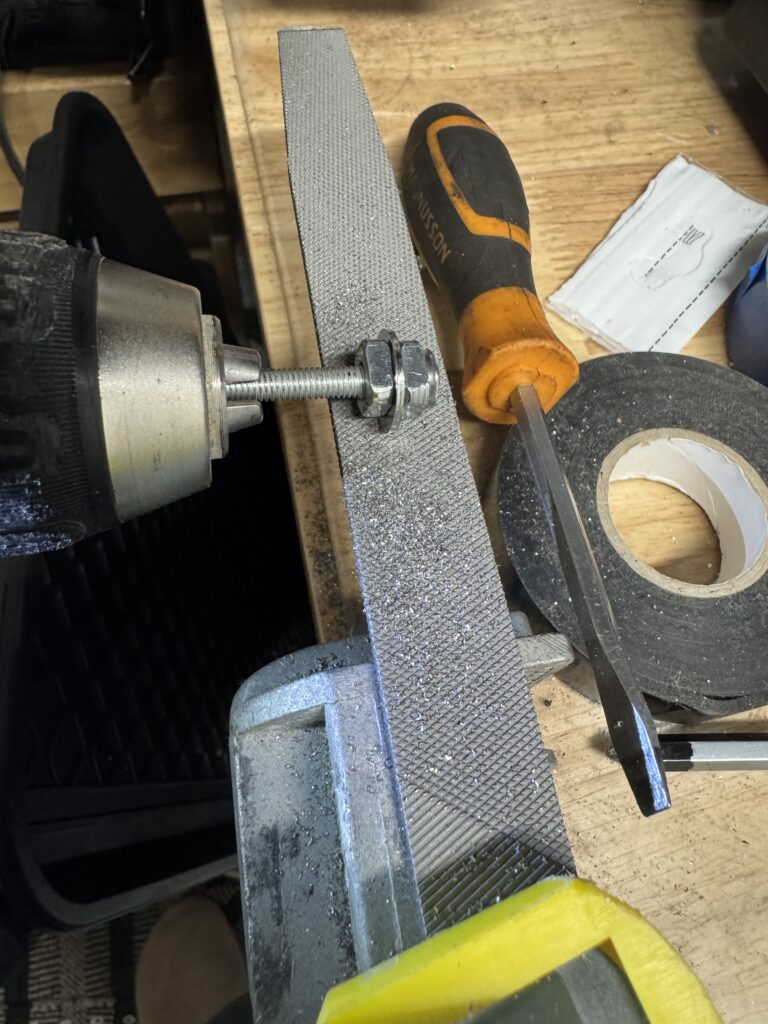
One example was the internal stabilising washers. To get them to fit inside the aluminium tubing, I had to sand down the outer edge slightly. Not ideal, but it created a tighter, more secure fit.
I made the boom slightly longer than the River Kings version, cutting the aluminium tubing to 23 inches. I can always shorten it later, but I wanted a bit more height to start with.
After struggling to find alternatives, I tracked down the same drain vent cap used in their build on Amazon and stuck with that, knowing it had already been tested.
My original hook bolt was too long, with the thread only running part way down, which meant I couldn’t get enough tension through the deck mounts. I swapped it for a shorter 116mm version with a full thread, which solved the issue.
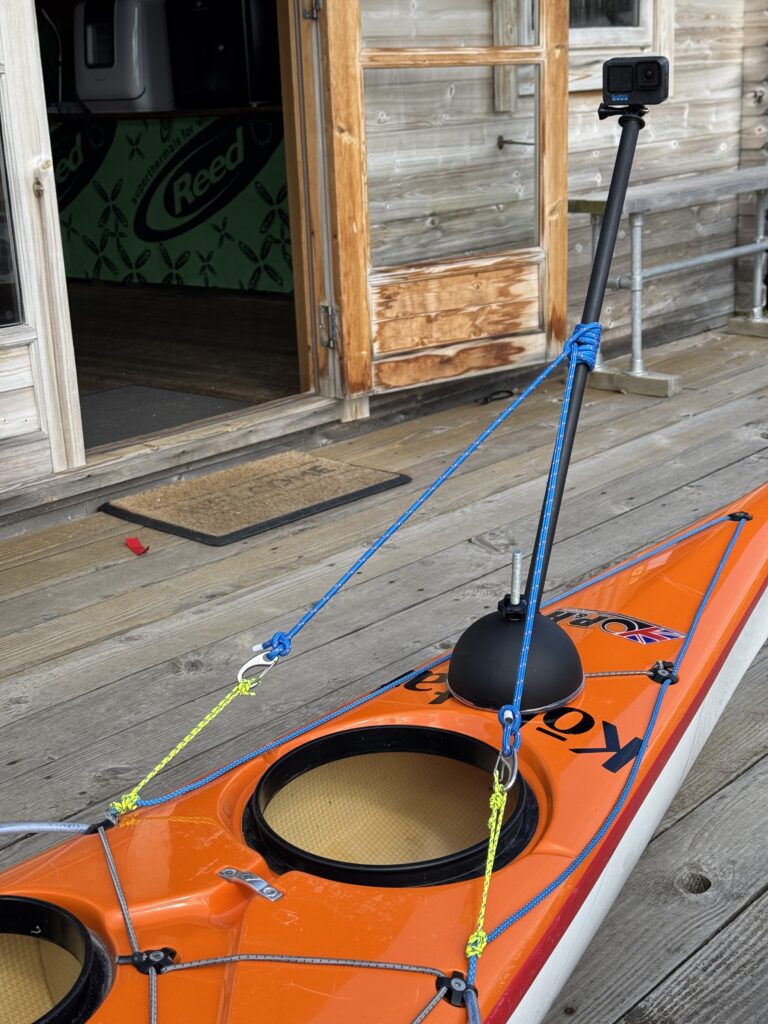
To protect the deck from the cup mount, I used clear flexible tubing, the same kind often fitted to deck lines.
A key part of the setup I’ve taken from Nick is the stabilising system. The Prusik-based tensioning works really well. It’s simple, quick to adjust and keeps the pole under control in moving water.
Instead of the webbing loop used in his version, I’ve used two Dyneema loops tied under the deck fittings, similar to what I use for kayak sailing. They sit cleaner and feel more direct, but may put more load through the fittings over time, so that’s something to keep an eye on.
For mounting positions:
- Bow setup: attached via a Dyneema loop under the deck fittings
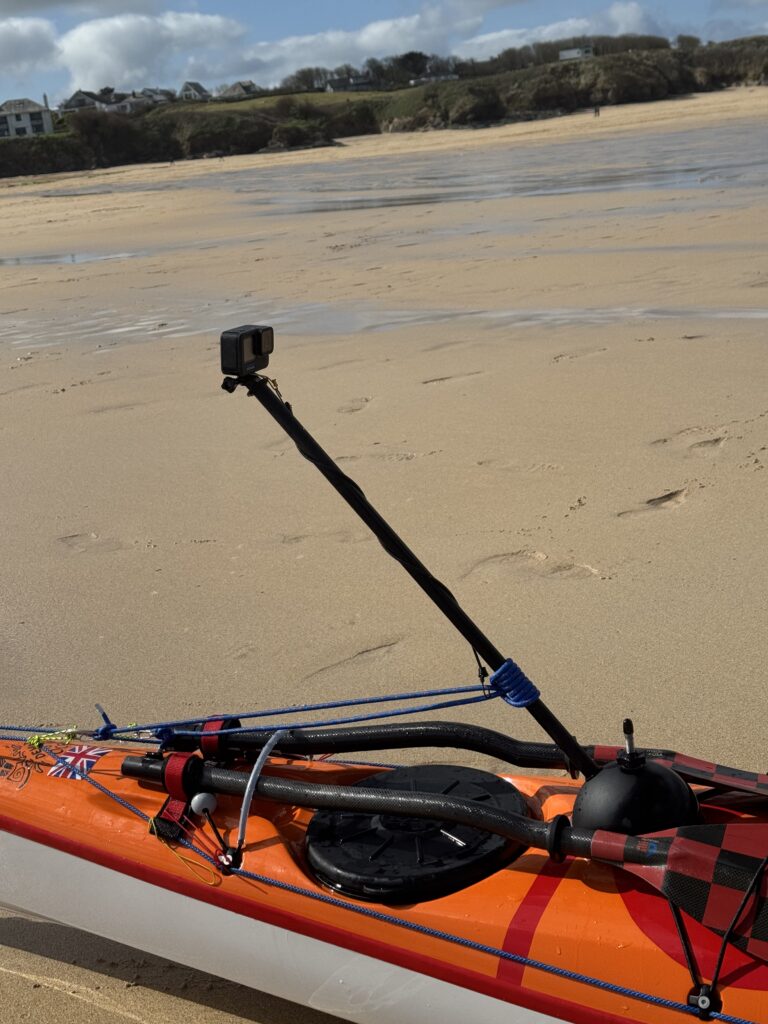
- Stern setup: clipped into the rear security bar on the P&H Aries, which worked really nicely
Both options give different angles and it’s useful being able to switch depending on conditions and what you’re trying to capture.
Putting It to the Test
Trevose on the ebb delivered.
The race was building nicely. Big technical water. Fast-moving, breaking sections, enough power to make things interesting and some surf zones to launch and land in.
Exactly what I wanted.
The mount held.
No wobble. No slipping. No awkward angles.
And most importantly, the footage actually started to look like what it felt like to be there.
You can see the speed of the water. The movement of the kayak. The scale of the features.
What Worked and What Needs Considering
What worked:
- The extra height and distance from the kayak made a massive difference
- The rigidity reduced vibration more than expected
- It stayed secure, even punching through waves
What needs consideration:
- Depending on placement, the mount could get in the way for a roll, a rescue or a self rescue. This setup is very much skill and environment dependent and needs to be used with that in mind.
- Modern deck fittings are designed to deal with a lot of stress but repeated pressure may cause the fitting to flex, break or loosen.
- As mentioned in the River Kings video, it’s worth trimming the hook bolt down once you’re happy with the fit. Even with a rubber cap, leaving it too long could create an unnecessary hazard.
Even small changes in camera position can completely change the feel of the shot. Sometimes just a few centimetres makes the difference between average footage and something that really captures the moment.

Why This Matters for Sea Kayakers
Capturing it properly helps tell that story.
Not just for social media but for learning. Reviewing lines. Seeing how you move through water. Understanding what’s actually happening beneath you.
Watch the Setup + Footage
DIY Tutorial from River Kings:
https://www.youtube.com/watch?v=eVSwUE1vcRY
Nick Butterfield’s setup:
https://www.instagram.com/reel/DVrz2DMiQLS/?utm_source=ig_web_copy_link&igsh=MzRlODBiNWFlZA==
My Videos:
Trevose Head – https://www.youtube.com/watch?v=DJTER7tvgB0
Greenland Rolling – https://www.youtube.com/watch?v=iIHtxt6KW8o
Parts Used
I’ve purchased some of these bits in multiple quantities, if you’re local or attending a course at SKC and looking to build your own, let me know and I may be able to help you out with some of the smaller parts!
- Oatey Mushroom Vent Cap: https://amzn.to/4sra2uf
- M10 Stainless Steel Hook Bolts: https://amzn.to/4snPsuI
- Round Rubber End Caps: https://amzn.to/4t4gOY8
- M10 Star Knobs: https://amzn.to/4e8R8Vu
- GoPro Tripod Mount: https://amzn.to/4tExqpd
- Aluminium Tubing: https://www.aluminium-online.co.uk/product/3-4-x-16swg-aluminium-round-tube/
- Threaded Bar 1/4-20 UNC x 36inch: https://www.accu.co.uk/imperial-threaded-bars/355435-HTB-1-4-20-36-A4
- 1/4 inch Flat Washers Stainless Steel (slightly too large, require sanding: https://www.accu.co.uk/imperial-flat-washers/37108-HPW-1-4-A2
- 1/4-20 UNC Imperial Nylon Locking Nuts: https://www.accu.co.uk/imperial-hexagon-nylon-locking-nuts/36951-HNN-1-4-20-A2
Some of the links above are affiliate links, which means I may earn a small commission if you choose to buy through them, at no extra cost to you.
Discover more from AN MOR KAYAK
Subscribe to get the latest posts sent to your email.